Monday, May 31, 2010

Ellie's Loom

First a little history:

Sometime probably in the late 70's or early 80's there was a weaver named Ellie who bought a new 45 inch 8 harness Herald loom with a sectional beam. I am sure Ellie dreamed of all the wonderful things she would weave on that loom.

Life must have interfered, because she never go around to weaving on her new loom. It never had a warp.

This year, Ellie, whose memory is failing, moved to assisted living. The unused loom remained behind, stored in a garage with only rats and mice for company. The harnesses collected a little rust.

Ellie's close friend and neighbor began the hard task of cleaning out Ellie's house. The loom went up for sale to another weaver.

------

Over the last several years, I have been teaching myself to weave. When I started, I thought I would never get a 4 harness loom threaded properly. I marveled that anyone would ever want more harnesses.


However, time in the chair has cured most of my early problems with crossed threads and missed headles. So I decided that if a loom appeared with more than 4 harnesses and if it were inexpensive enough to get passed my strong tightwad nature, I would buy it.


I was at knitting group one day talking about this to some other weavers, and I told them that I was convinced my new loom would find me.


Then, over a week ago, there was a posting to both Weaver's Guilds that I belong to that there was an 8 harness loom for sale. The price was right but I hit delete on the emails because I just had no time to investigate the loom. I was going out of town for several days so the timing was just all wrong.

My friend Kay, of Cordova Studios, also knew that I was looking for a loom, so she kindly forwarded me the email announcement which I saw for the third time. I hit delete. I was just too busy to look into it.

I thought about it all weekend while I was gone. I finally decided that if the loom was still available when I got back (and I thought that was unlikely) that I would check on it and go look at it. So I did.


The loom had not been sold to my surprise. No one had even looked at it. When I saw it, I knew my loom had indeed found me.

It took me a day to get it cleaned up. My husband has adjusted the brake. I think it is ready to warp.

I am now re-reading all my weaving publications, paying attention to all the new possibilities that 8 harnesses bring. I think it will keep me busy for a long time.

Now to get a warp on it!

Wednesday, May 19, 2010

Basketweaving - Not the Underwater Kind


Today my Spinning Buddies, the Texas Twisters met at Nancy's house to learn to make a Spinning Basket. This basket is perfect for wool and even has a lazy kate built in as well as a tool holder and a small basket for trash or maybe hand cards or wool combs.

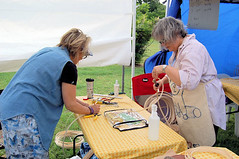
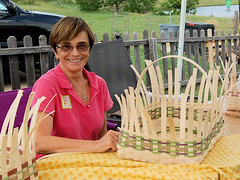
Nancy had everything well organized. We started by measuring all of our materials. The first photo shows Laurie and Joanne working on measuring and cutting the reeds.

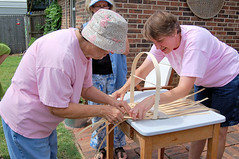
Next we made the bottom of the basket. Here is a photo of Nancy showing Maxine how to get started. We lined up the reeds for the basket bottom with the right sides facing down.

Then we wove a couple of reeds on each side of the handle to get it stablized and centered. Finally we wove enough reeds to complete the bottom of the basket. Then we checked to be sure the corners were square.


Once the bottom of the basket was woven we twined around the edges to keep everything squared up. Then, we started up the sides of the basket. The first couple of rows was the most fiddly part I think. This photo is Laurie starting to weave up the side.

As we got higher up the sides, we added in some colored reeds to make each basket our unique work of art. No two are alike and each is beautiful.

We worked hard, but could not finish the entire basket in one day. Basketweaving, like most crafts, takes a lot of time.

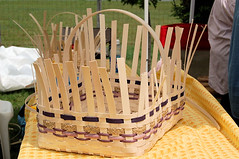
Here are photos of some of the baskets as they were at the end of the day. Unfortunately, I don't have photos of all of them.


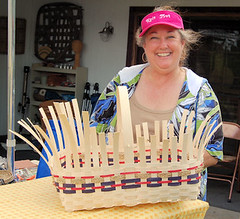
First is Sharon with her basket. She used red and blue reeds in her basket.


Here is Peggy's Basket. Peggy has one row of red reed, and I think she plans to add in some green reeds as she gets farther up the sides.


Kay used green and purple in her basket.


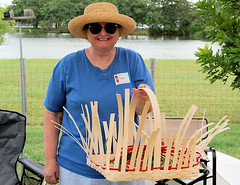
And here is my basket. I used two shades of purple and one round of a rose pink in my basket.

We still have to add the upper basket on and finish the top edges. There is also another small tool basket to make that is attached to the side near the handle.

I hope we get to finish this next week. It is going to be beautiful and so much fun to use!

Sunday, May 2, 2010

Dyeing without a Dyepot


This weekend I attended a three day workshop with Holly Brackmann called Dyeing Without a Dyepot. The workshop was sponsored by the Fort Worth Weavers Guild. I was one of about twenty attendees and I loved this workshop.

Holly is the author of the book The Surface Designer's Handbook: Dyeing, Printing, Painting and Creating Resists on Fabric. The book covers many types of dyes for all sorts of surfaces. It is an excellent resource.

The workshop focused on one type of dye, that I don't think anyone attending the workshop had ever used before. This dye is Pro Transperse Transfer Printing Dye which is used to transfer patterns to polyester and other synthetic fabrics.


The dye is applied to a peice of paper or transfer medium (an interfacing for example) and then is heat transferred to the fabric. The result is a bright, permanent transfer. In the photo, Holly is showing the dye as it appears on the paper on the left and after it has been heat transferred to the fabric on the right. Dull unidentifiable colors become bright and vibrant with a little heat and time. The fabric remains soft and supple and the fabric can be washed.

There are all sorts of possibilities with this dye, and the workshop explored many of them. The dye comes as a powder and is mixed into solution with boiling water. At that point it will keep, but may settle and needs to be mixed if it has been sitting for several hours. The dye can be directly brushed on paper, or it can be thickened and used with screens or stencils.

Once the paper is dry, the dye is transferred to fabric by heat setting it. To heat set the dye, hte fabric is put face up on a lightly padded ironing board, then the transfer is placed face down on top of the fabric, followed by a piece of parchment paper. Next heat is carefully applied. The longer the dye is heated the more color is transfered - but caution is needed since the polyester fabrics will melt if they get too hot. We did a lot of ironing this weekend!

We learned how to take a photocopy and turn it into a heat transfer by applying dye then ironing it onto fabric. The dye adheres to the black in the photocopy and the images are stunning. We also experimented with fabric crayons, and learned that some tissue wrapping papers are used dispurse dye transfers that can still be used!


We explored using many objects as resists to the dyed paper. One popular resist was a feather. A sheet of paper was painted with the dye and allowed to dry. Then the resist object - in this case a feather, was laid on top of the fabric, followed by the face down dyed paper. The result was almost like an X-ray.


In many cases, the resist object would pick up enough dye to allow it to be used as a transfer, so it is possible to build up colors and effects.


We thickened the dye with a thickening agent, and applied it to our paper with homemade stencils and with screens for screen printing. The thickened dye can also be applied directly to paper, then objects can be drug through it to form all sorts of lines or patterns.


The transfers can be applied to sheer fabrics too. Dramatic effects can be achieved when a sheer layer with transfers on it is placed over an opaque layer also with transfers.

We learned how to apply foil decorations to some areas as accents to the rest of the piece.

It was a great weekend of learning and fun with more ironing than most of us had done in a long time. Certainly we all have a new trick or two in our bags.

I can not wait to see what some of these very talented women will create in the coming months with the things we learned in this wonderful workshop. We also have an new appreciation for a type of fabric many of us rarely use in our crafting - polyester.